

Home
About Us
Allotments
Garden Equipment
Seed Suppliers
Manure Problems
Children's Pages
GLA Blog
Weather Blog
School Veg Patch
Useful Links
Make a wormery
The easiest way to make a wormery would be to use a large jar filled with soil but it is likely that the worms will stay in the middle of the jar and remain out of view.
To make the wormery described here you will need:
- an adult to help you
- 2 sheets of clear plastic each about 30 cm square
- 2 sheets of black card or strong black paper
- some blu-tac
- a 90 cm length of wood about 7 cm wide and 2 cm deep
- about 20 screws
- various types of soil, sand, compost
- leaves
- and of course some worms
- a collection of dead leaves, grass clippings, potato peelings etc to feed your worms
- a saw
- a drill
- a screwdriver
Making the wormery:
 Saw the wood into three 30 cm lengths.
- Drill a few small drainage holes into one piece of wood. This will be the base. The drainage holes will allow water to drain out so that the soil does not become waterlogged. Worms will die if this happens.
- Screw the pieces of wood together into a U shape
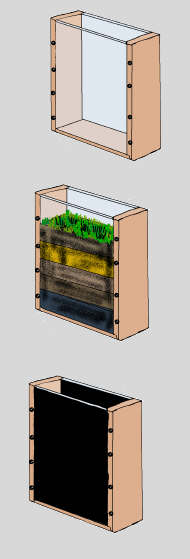
- Screw a piece of plastic onto each side of the frame as shown in the first picture.
- Fill the wormery with layers of different coloured soil, compost and sand as shown in picture 2. Do not fill right up to the top. Each layer should be about 2 – 3 cms thick
- Place a thin layer of gravel or you could put a thin slice of turf on top.
- Using blu-tac, fix a sheet of black card or paper over the plastic. (The worms need to be kept in the dark).
- Lightly water the soil. (The soil must be kept damp).
- Place the wormery in a cool shady place. The worms will die if they are too hot or in the sunlight.)
- Dig up two or three worms and place them in the wormery. (They will burrow down into the soil).
- Place some dead leaves or grass clippings on the top. (This is food for your worms).
- Leave the wormery for several days but don’t forget to make sure that your worms have a supply of dead leaves or grass clippings and do not let the soil dry completely. Avoid taking off the paper to peep as this will make the worms move into the centre of the wormery and out of view.
- After few days remove the black paper to see how the worms have tunnelled in the soil. You may also see worm casts on the surface just as you sometimes see on the lawn.
Don’t keep your worms for more than a week or so or they will die.
Tip out the soil to release the worms but have a close look in the soil to see if you can see any egg capsules or cocoons. They are very small (about 4 times as big as a pin head) brown and shaped like a lemon. Young worms will be developing inside these cocoons.
Click here to download the printer friendly version
Click here for more information about keeping a wormery to compost household waste
Click here for more information about earthworms
Our Plot at Green Lane Allotments Blog | A Gardener's Weather Diary | School Vegetable Patch Website
© Our Plot on Green Lane Allotments - Please email me if you wish to use any of this site's content
Our Plot at Green Lane Allotments Blog | A Gardener's Weather Diary | School Vegetable Patch Website
© Our Plot on Green Lane Allotments - Please email me if you wish to use any of this site's content